CHECKOUT SOME OF THESES LINKS,SOME GREAT IDEAS
NONE OF THE DIY PROJECTS ARE MY OWN,THEY ARE OWNED BY OTHER WEBSITES
http://fashion.onblog.at/en/diy-advent-15-detachable-shoe-decoration-second-set-and-action
http://www.instructables.com/id/Jewelry-Making-1/
http://fashion.onblog.at/en/diy-advent-15-detachable-shoe-decoration-second-set-and-action
SAFETY PINS & BEADS
THIS WOULD LOOK GREAT AROUND A THIN BANGLE SO EASY :)

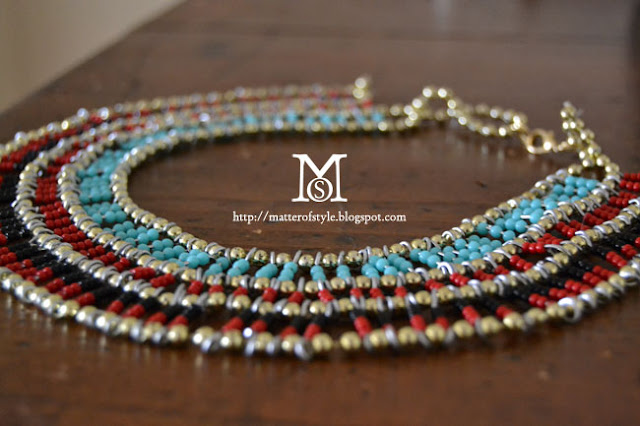
Level after level, yesterday we saw how to master the safety pin necklace technique. Today I want to show you how to make an egyptian inspired necklace using just a beaded chain, colored beads and metallic wire. I chose these items because they were available in my stash but you can easily substitute them with safety pins and a box of gold beads to fill the space between safety pins. In case you're wondering where you can find the beaded chain, do not take it from the box of Christmas decorations...like I did.
See the tutorial after the jump.
Dopo il post di ieri avete tutte le informazioni necessarie per specializzarvi in bigiotteria realizzata con le spille da balia. Oggi vi mostrerò come realizzare un collier di ispirazione egizia utilizzando del filo metallico e un catenella di perline, tutti oggetti che avevo in casa e che potete tranquillamente sostituire con le spille da balia e una scatola di perline dorate da infilare nel filo tra una spilla e l'altra.
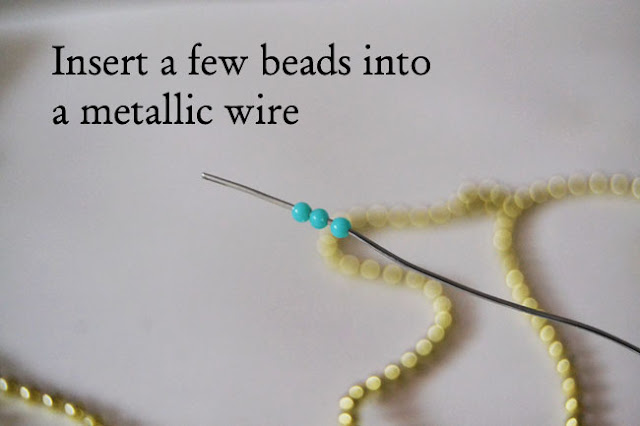 |
| Inserite delle perline in un filo metallico |
 |
| Curvatene gli estremi con una pinza formando delle cappioline |
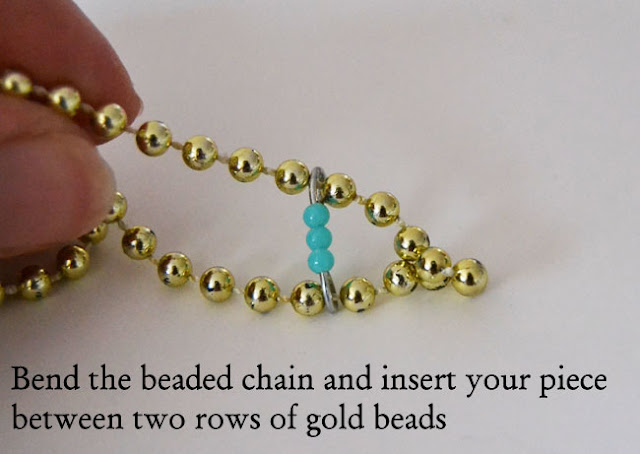 |
| Piegate la catena di perline in due (lasciate il capo più lungo da una parte, e agganciate l'elemento tra i due fili |
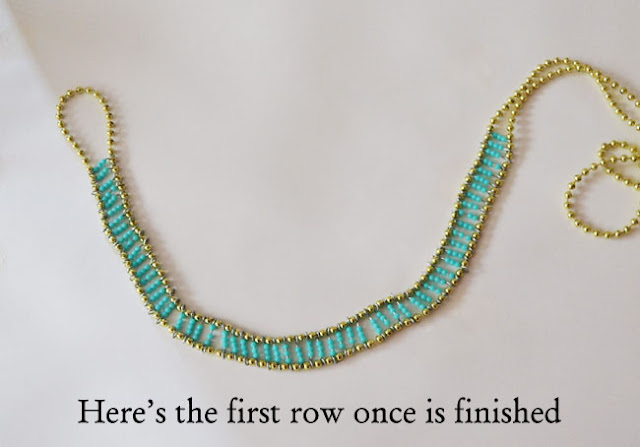 |
| Continuate ad agganciare le perline fino ad terminare la prima fila. |
 |
| Piegate ancora il filo dorato per aggiungere una seconda fila di perline |
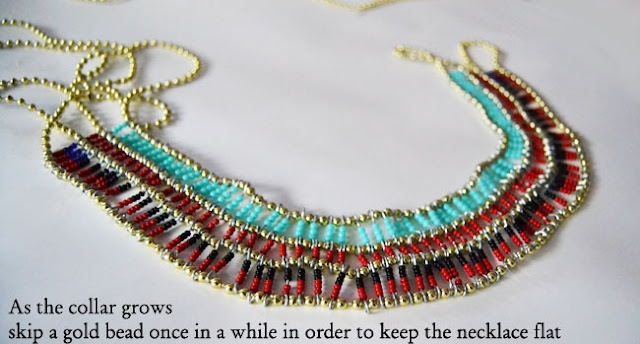 |
| Man mano che il collier cresce in ampiezza ricordatevi di saltare una perlina dorata ogni tanto, vi permetterà di mantenere la collana piatta! |


10 DIY ideas to customize your sunglasses
 pearl sunglasses - a morir flower sunglasses
 mercura sunglasses
 Chanel masquerade ball sunglasses - mercura sunglassesYou'l read more
 Arm party
 Today I would like to show you 5 different techniques to make some nice and easy bracelets. I wanted new bracelets and a lot of them so I made these very quickly. The best thing about these bracelets is that if you're crafty you'll make them for free because they can be made with what you have in your st read more
 BUY or DIY studded iphone case
 studded bra
 studded heels by Louise Goldin for Topshop


I love to play with food. And pasta is just perfect to make crafts with. This beautiful necklace is made with penne! I wanted to make a statement piece and I think it turned out just perfect. What do you think?
What you need
- 20 pieces of penne (plus a few more for breaking)
- paint
- a simple chain necklace
- glue gun
- cardboard
- scissors
How you make it
Paint the penne in the color of your choice. While you are waiting for the paint to dry cut the cardboard in the shape of the hangers. Put two of the penne pieces on your necklace. Now place one of the two smaller pieces of cardboard underneath it and use the glue gun to make the penne stick to the cardboard. Glue the the other four pieces of penne underneath it to finish the first hanger. Now repeat for the bigger hanger and the other smaller hanger.
That’s it. A beautiful penne statement necklace made by you!
..................................................................................................................................
DIY: Statement Necklace {Recycled!}
As I mentioned in my last DIY, I sometimes like to give broken jewelry new life. You can use beads off of a previous piece or buy new beads if you prefer! In this case I just didn't want to part with my wooden bracelet.
What you need: Pretty Ribbon, Wire, Beads or anything you can thread on your wire
Instructions: Thread your beads onto the wire, make a loop at each end, and the tie the ribbon on both ends.
Or you could buy ones of these fab pieces I've been lusting over!! lol :)

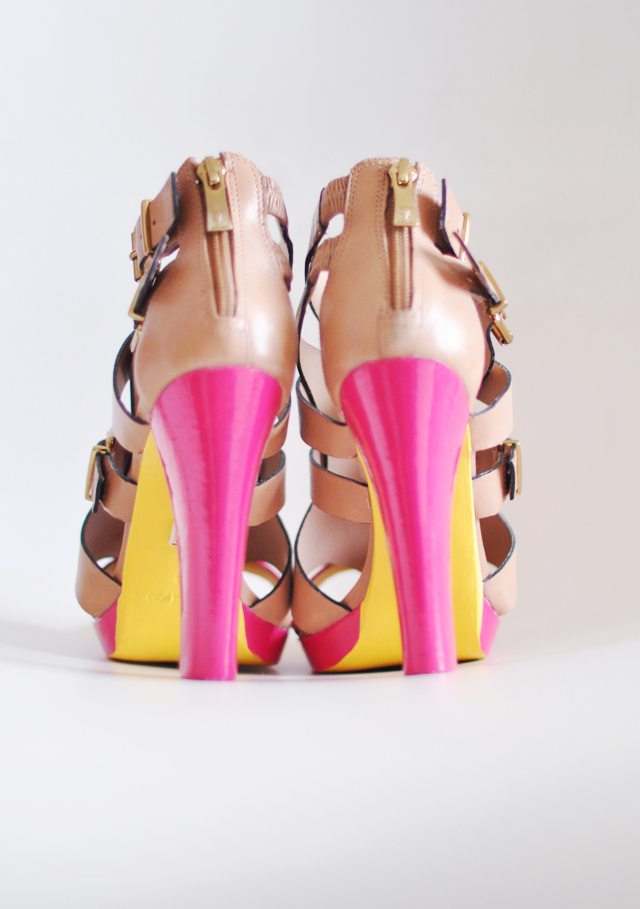
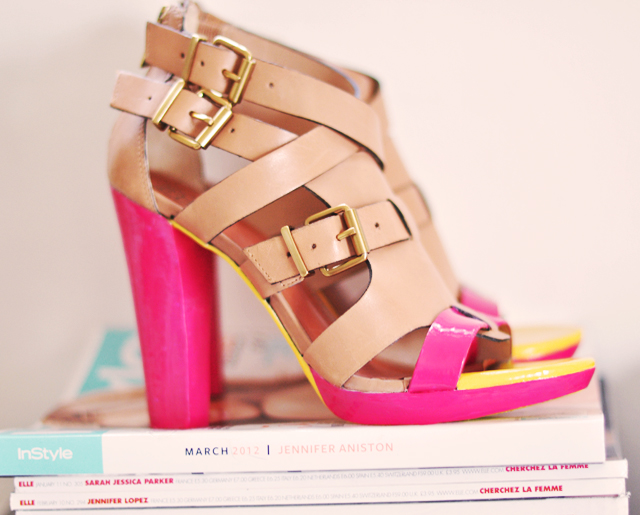
Neon Shoes DIY & Painting Leather

I was inspired by this photo of a
neon pink and yellow soled shoe I "pinned" a few weeks ago but because it was uploaded without a URL, I hadn't a clue who it was by or where I could
buy it. After a bit of research, I
think it was originally available at
Topshop but was sold out by the time I discovered it. Which leads me to this: Please, when using
Pinterest, if you upload your own photo, go back in and edit it to add the original link. Not only because it's the right thing to do when uploading images that do not belong to you, but also, in this case, for shopping purposes ;) But regardless, it inspired this DIY...
I spread this project out over a number of days so as not to rush it and while you can use a hair dryer to speed the drying process, I found it was just as easy to add a new coat the following day and then another the day after that. *SAFETY TIP: Make sure if you're using toxic paints to work in a properly vented area.


* Shoes in a near natural/raw leather state sans major finishes. Mine are
Pour La Victoire sandals...
seen here.
* Rubbing alcohol, a cloth, q-tips.
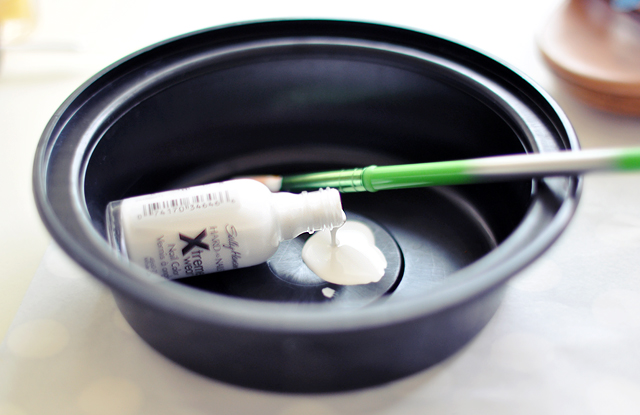
* Nail polishes, including white. *NOTE: You may also use acrylic paints or Acrylic Leather Paint. I chose nail polish because of its high gloss finish and because it was easy to come by. I chose Sally Hansen Xtreme Wear polishes because of their consistency and thickness. Top coat is optional {I actually didn't use one but am curious to see how they "scuff" without it - Also, my colors aren't as "neon" as my inspiration}.* Nail polish remover and a fine or thin/angled paintbrush.
* Paint brushes {you may choose to just use the brushes that come in the nail polish bottles, which ended up being a better choice than the synthetic brushes because the nail polish brushes left less brush marks and applied thicker coats}.
* Drying racks... I used a candlestick and a paper towel dispenser.
* Hair dryer is optional, speeds up the drying process.
* Painter's tape.

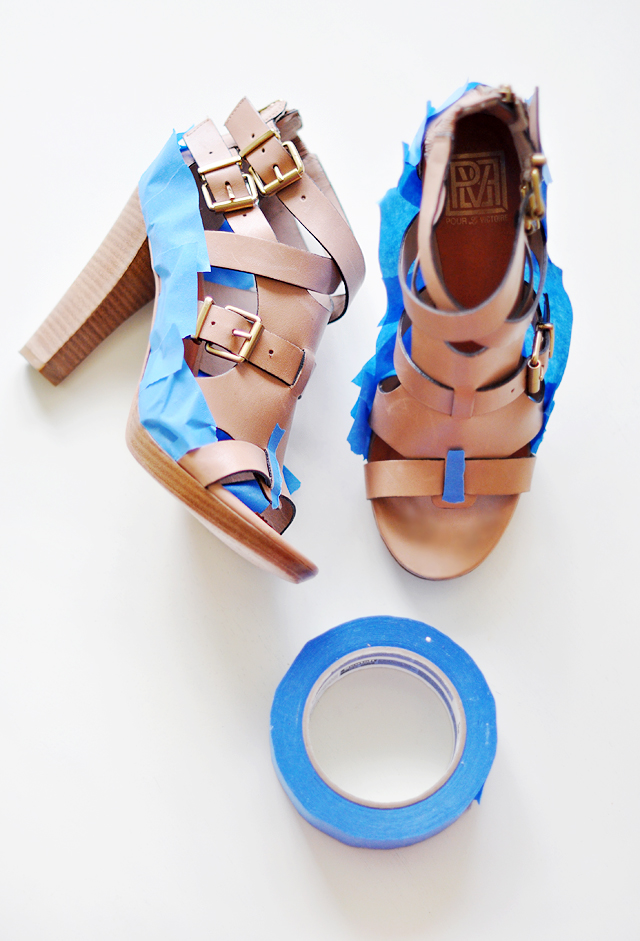
* Using your painter's tape, tape off all areas of your shoe that you
don't wish to paint.

* Using rubbing alcohol {in a vented area} treat all the areas of the shoes you're going to paint by simply taking a cotton swab doused in alcohol and rubbing it on. Use a rag or washcloth for the larger areas, like the sole.
* Begin with your white paint, and as a primer of sorts, cover all areas that are to be painted with a coat or two of white. I used the larger/synthetic brushes for this step, especially for the the soles and heels.
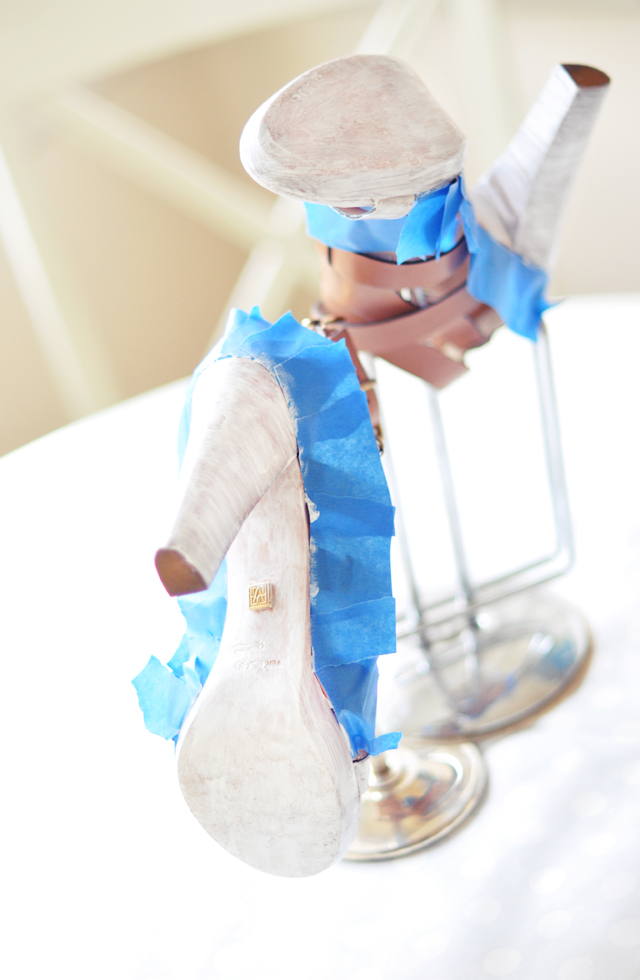
* Let you primer dry over night.

* Begin painting on your bright neon colors. I painted the soles first then proceeded to do all the yellow areas. Use your lightest color first. You can easily paint over any mess ups with your darker color.

* Paint any areas not touching your opposite/wet color, to speed up the process.
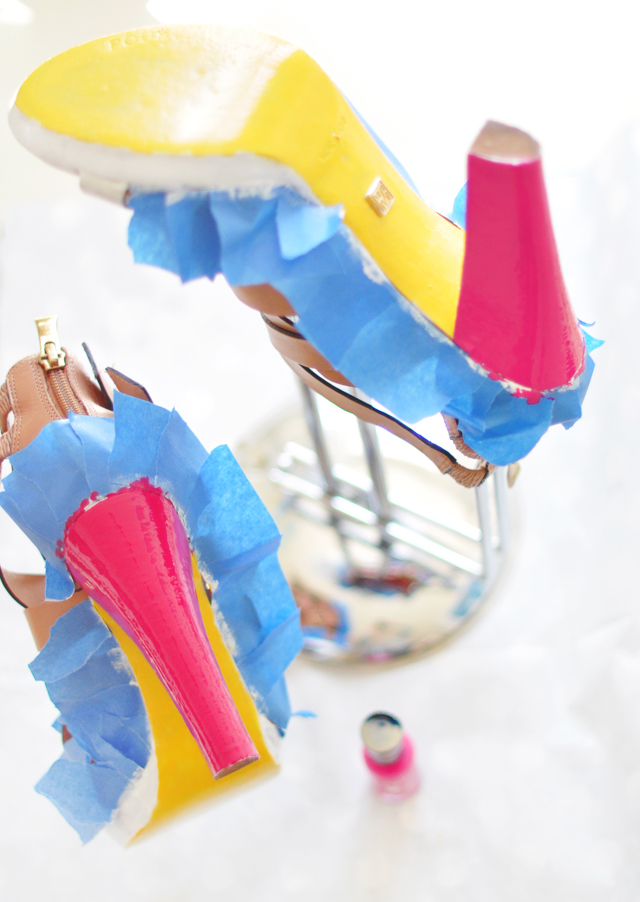
* Let your first coats on all areas dry overnight. Once completely dry, cover each area with a second coat {painting in the opposite direction of the last} and let dry. Apply a top coat if you like.
* After all coats of paint are dry, go through with your fine angled paintbrush and using nail polish remover, tidy up any mess-ups. It didn't affect my leather at all and removed the excess paint quite nicely.

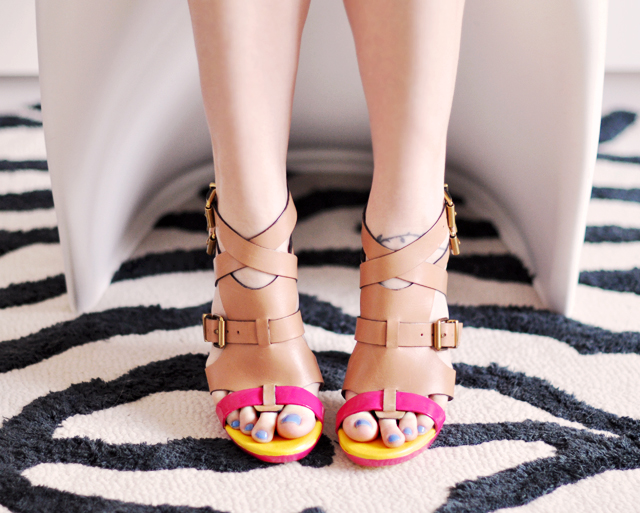
* Essie's Lapis of Luxury on my toes *

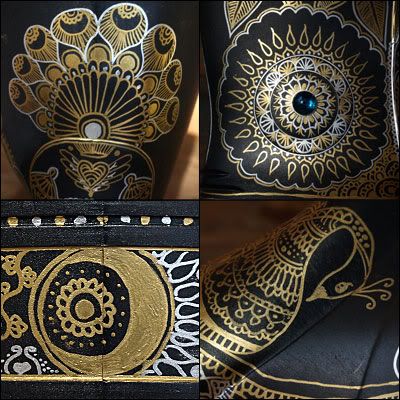
GLAM GUMBOOTS
Hello world,
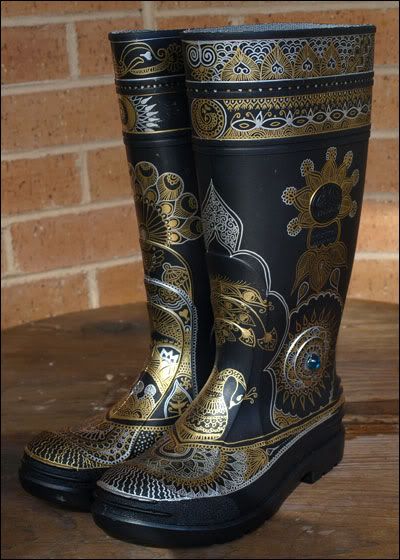
Here they are! My beautiful custom gumboots. I may even do some more work on them in the future... depending on how I feel. There's space for more but I do love them as they are.
To replicate these all you need is:
- A clean pair of gumboots - I picked up my pair from Bunnings for $20
- One or more permanent paint markers with a fine nib - I used gold and silver Artline 999XF with a 0.8mm nib
- And internet connection or a library where you can look up examples of the many and varied awesome henna patterns... or, you know, innate artistic talent (I went with the internet connection and the library books as my Mum funnelled all of her drawing talent into my little brother Michael)
I also used a couple of stick-on jewels I had left over from my cake pop bouquets a few years ago. If you're planning on adding anything like that, I suggest using construction adhesive (in careful quantities) because hot glue won't stand the elements (Selleys in a good brand; they even have one specifically for rubber).
Method: Just go for it! Hmm, but if you're concerned about not getting it right first time, I'd recommend first doing some practice on paper. e.g. I made one of my zine-per-diems just henna patterns - they're fun, pretty, easy even if you're not good at drawing, and you end up feeling quite calm and tranquil while you're doing it.
For a great resource on the mechanics of drawing henna patterns, as well as examples of some masterpieces and descriptions of the different styles of henna around the world, check out The Henna Page.
Yes, they survived. The mud came off easily, and any spots that had dried too much to come off under running water were easily removed with a soft damp cloth. In face, the walking and the cleaning didn't affect the drawn-on patterns at all. Success! The only smudge is from where EJ's ridiculously heavy torch was resting on them in the bag on the way home.
Recipes
VINTAGE MENS TIE SKIRT
I WILL MAKE THIS & ADD THE PICTURES SOON
This was made from men's ties BUT I THINK IT WOULD LOOK GREAT & VERY BOHEMIAN AS A SKIRT NOT A XMAS TREE BASE.They have been open up but if you have enough you would not have to open them up.
Cut the length you want from each (should be the same length), then hand or machine stitch them together. Leave the last one open so it will go around the tree. Cut a hole in the middle and use one of the cut off pieces as a binding. Some men have quite a collection of Christmas ties that would work perfectly for this.

I hadn't seen a truly unique skirt in a while until I stumbled upon this. It is a quirky skirt that is made from ties! I'm sure whoever designed it had to burglarize some men's closets to get her hands on so many ties. It looks unique and trendy and totally fun. It has a whole bunch of ties, some silk, some ties, some designer imported, and some just fun and colorful. You won't find anything like this in a store, you will have to make one yourself! I hope your man won't miss a few ties.
I'm going to attempt this fabulous dress with recycled revamped items,let see how I go.


Wear them as shown above or fold them downwards:


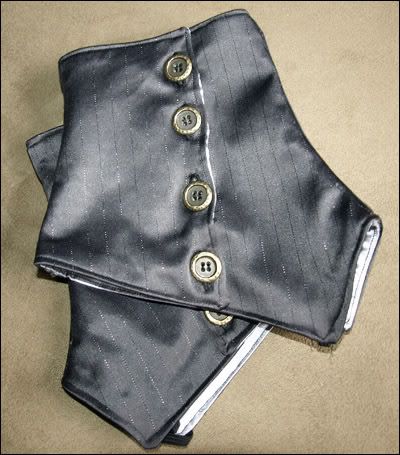
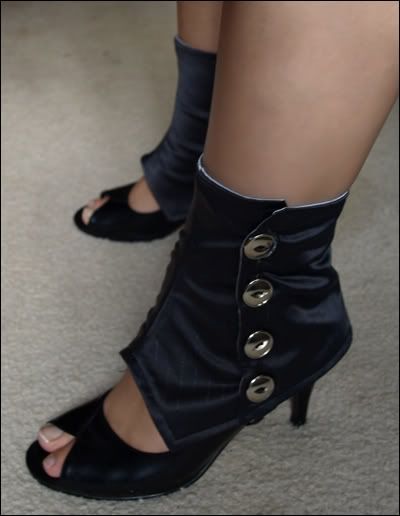
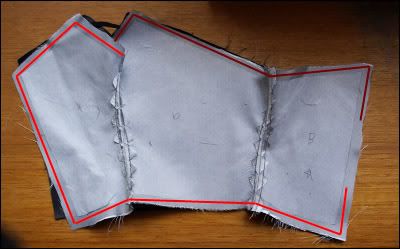
SPATS
Apologies that I don't have pictures of the first couple of steps - I began making this pair before I decided to make a tutorial! :)
Materials and tools
- Main fabric - at least 1x0.5m
- Lining fabric - at least 1x0.5m
- Matching cotton thread
- Iron-on interfacing
- Elastic - 2x 10-12cm lengths; use thin elastic, like 5-10mm width
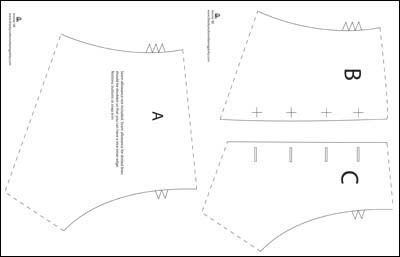
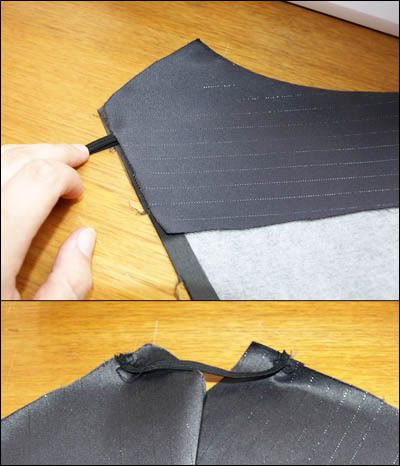
2. Print the pattern and cut it out. Place the pattern pieces on the interfacing with the printed side up and cut two of each pattern piece. Then place your pattern pieces on the interfacing printed side down and cut two more of each piece. This way you will have one spat for each foot. You know what I mean! It's easier to visualise than to explain.
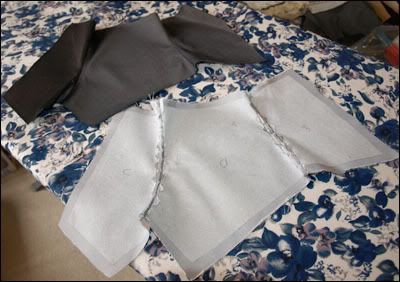
3. Separate your interfacing pieces in two identical piles (each containing 1 A and 1 mirrored-A, 1 B and 1 mirrored-B, 1 C and 1 mirrored C) and iron one pile to your main fabric, one pile to your lining fabric. Make sure you leave enough space around them so that when you cut them out you can add 1cm seam allowance. Also make try to ensure you put your fabric's max stretch going across the pattern pieces. Cut them all out with 1cm seam allowance.
4. For both the two mains and the two linings, sew the seams as indicated by the notches in Thank you for not being perky's pattern, i.e. piece B on the left side of piece A, C on the right side of A. You can see one main and one lining complete below.
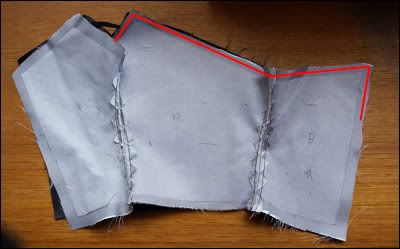
5. Now snip little triangles out of the seam allowance and iron it open. Doing this will prevent puckering in the curved seams. Run a topstitch down both sides of the seam, securing the seam allowances as shown below.
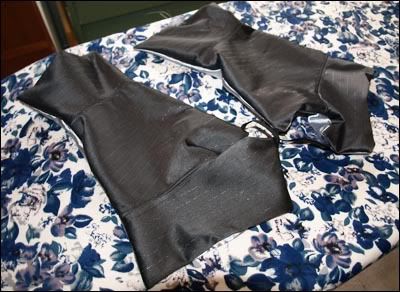
6. You will now be able to see the general form the spats will take. Fold over the front of one of the mains (i.e. fold piece C over onto piece A) so that the two peaks at the bottom of the front match, as you can see in the top part of the image below. You can see the position where the elastic should be attached. Mark this position on both your mains.
Baste your elastic in place on the main fabric. Make sure you sew it on the right side of your main, right near the edge of the fabric so that it will be hidden in your seam allowance in the finished product. (See the bottom part of the image above.)
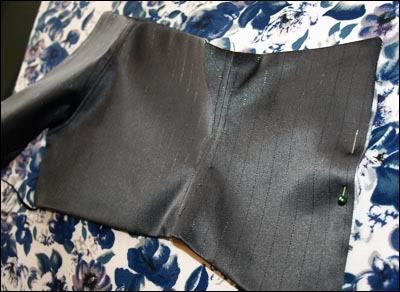
7. Now it's time to sew the first part of the perimeter. Place main and lining right sides together, then pin along the edge as indicated in the image below. It's important to do the perimeter seam in two parts, because the elastic pulls too much to get a neat seam otherwise. Make sure the elastic is hidden inside, between the main and lining.
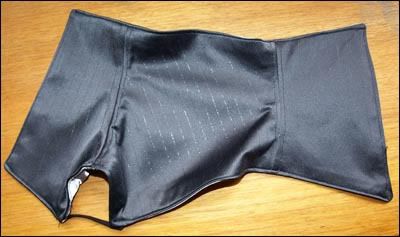
8. Now pin and sew the other part of the perimeter seam, leaving a gap for turning on the straight edge as indicated below. Oh yes, because of the curved seam, that little bit in the middle at the top of the work in my photo is just folded over. The seam really is continuous, since you will join the second part of the perimeter seam at the corner where the first seam ended. Once again, easier to do than to explain. :)
9. Trim the corners and then turn your spats right side out through the hole you left in the last step. Use something skinny to push the corners out so they're nice and sharp and heat up your iron.
10. Iron it flat, tuck in the raw edges around the turning hole and pin it shut.
11. Run a topstitch around the perimeter of your spats to give them a polisehed look and to close up the turning hole.
12. Add buttons and button holes and you're done! Note - if you suffer from the dreaded cankle like I do, you will want to position the buttons quite close to the edge of the spats so as to give you as much wriggle room as possible. Those with slender ankles, I envy you.
Et voila!
Alright. I hope you enjoyed this tutorial and that you will make yourself many and varied spats, because it's time they came back.
As a side note, I decided I will give this tutorial's pair away to the first person who leaves a comment saying they're interested and with a way for me to contact them. I don't want to call it a competition, because I disappointed myself by doing one very messy button hole and accidentally snipping a tiny hole (like 4mm) in the middle of the lining of one of the spats. As much as it pains me to be honest about these stuff-ups, I'd feel worse to send these away to someone without warning them about what to expect. Nonetheless, they're still pretty darn kewl, and no-one will see the lining hole when you're wearing them, and the button hole should be mainly covered by the, y'know, button. :)
........................................................................

First you should print the pattern. Then make changes to the length. As you can see, the original spats are quite short. And remember that the higher you make the wider they have to be, so you should measure your calf to know the right width. And I also made the spats a bit longer on the front, as you can see.
Sheer skirts appeared on runways and have been loved by many celebrities but the buzz about them started on the web. These skirts quickly became
bloggers'favorite and started to be photographed everywhere. With so many bloggers suggesting you ways to style them it's your turn to fall in love with the
sheer skirt. Today I'll show you the easiest way to make a sexy but not to revealing skirt. I added a
side slit that multiplies the ways to wear it. You can put the slit on one side, on the tight (like
Angelina), on the back or on the center front.
You'll need:
- chiffon fabric
- lining fabric
- 1 cm wide elastic band
 |
| bloggers -streetstyle - collage picture by bestylish.com |
 |
| celebs in their sheer skirts |
 |
| Fold the sheer fabric and sew the side, sew only 40 cms- Repeat the process for the lining |
 |
| This is how the side slit looks |
Put the lining into the sheer fabric.
Turn over the sheer fabric on the inside a couple of cms.
Make two seams with 1 cm of distance. Leave one side open. This is where you insert the elastic band.
Cut the elastic band the lenght of your waist.
With the help of a safety pin insert the elastic band into the skirt.
You're adjusting the skirt to the size of your waist and you'll gather some fabric.
Block the elastic with a few stitches and the skirt is done!
 |
| Expensive - Sapphire bracelet (I used as a "carpet") Birks - Affordable crystal bridal cuff on the right Etsy |
 |
| Affordable On the right vintage emerald necklace Etsy - Expensive necklace on the right Chopard |
MULLET SKIRT/FISHTAIL HEM
DIY instructions to make your own mullet skirt. Of course if you don't feel like making one from scratch you can follow
these instructions using an existing skirt.
I've also included instructions for adding a mullet skirt to a dress pattern so you can make a "mullet dress"!!
Materials and Supplies
- Paper
- Pencil
- Measuring Tape
- Scissors
- Tailors Chalk
- Sewing Machine
- Fabric (Approx 1.5m)
- Thread to Match
- 1cm wide Elastic (length = your waist measurement)
Instructions
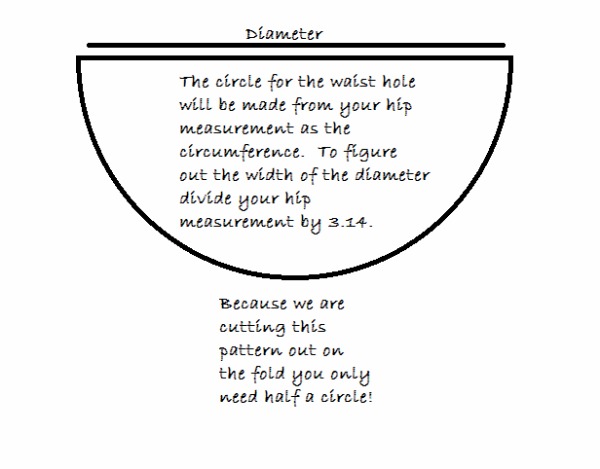
1. Draw a circle with the circumference being the same measurement as your hips. Cut or fold in half (or only draw half).
2. Lay out your fabric as shown below. Place your half circle pattern on the fabric along the fold the measurement of the length that you want your skirt to be in the front + 3cm (1 3/8") from the left edge.
3. Measure from the opposite side of your waist hole along the fold towards the right edge of the fabric the length that you would like the back of your skirt to be. Mark there with tailors chalk.
4. Measure down from the center edge of the waist circle towards the bottom of your fabric the length that you would like your sides to be. Mark there with tailors chalk.
The measurements that I used for my skirt:
Front length = 46cm (18")
Back length = 76cm (30")
Side length= 56cm (22")
5. Use tailors chalk to join all your marks with curved lines.
6. Cut out your pattern by cutting out the waist hole and around the line you just made.
7. Make a casing for your elastic by turning down the inside edge of the waist circle 2cm (3/4") towards the inside of the skirt, then sew around it at 1.5 cm (5/8"), leaving a hole in the center back to feed your elastic through.
8. Feed your elastic through the casing (I used a safety pin to help pull it through). Sew both ends of the elastic together. Sew the hole closed. For clearer instructions on making a casing see steps 4-8 on
this tutorial.
9. Hem your skirt with whatever method you'd like. I serged mine using the rolled hem setting. If you don't have a serger that does this I would recommend doing a small rolled hem.
Because the fabric I used was sheer I lined my skirt, and completely skipped steps 7 and 8 by sewing together a tube of fabric the width of my hips and the length of the front of the skirt. I joined it to the mullet skirt by putting the pretty side of the mullet skirt fabric against the ugly side of the tube and sewed them together at the top of the tube and the waist circle of the skirt. Then I flipped my skirt right sides out, pressed everything flat along the top. and then sewed in 1.5cm (5/8") along the top edge leaving a hole in the center back to feed my elastic through the two layers.
How to Alter a Dress Pattern to have a Mullet Skirt
-
Find a dress pattern that has a seam along the waist and a center back zipper (I used Butterick B6582)
-
Find out what the finished waist measurement is of the size you are making.
-
Make the mullet skirt pattern using the finished waist measurement instead of the hip measurement.
-
I would recommend putting some kind of marking on the top part of the dress and the skirt at the center front so you can make sure everything is lined up correctly while sewing.
-
After you've cut out your skirt pattern cut the fold along the center back from top to bottom.
-
Usually the addition of a back seam would mean that we should make the circle measurement bigger, but with so much of the waistline being along the bias it actually will stretch more than enough to make up for that.
-
Sew together your dress attaching the circle skirt to the patter instead of the original skirt pieces
DIY Burberry Tribal High Heels


DIY: Burberry Prorsum Beaded Sandals
A few months ago I received a request from
Rebecca to DIY some Burberry Prorsum beaded heels, and here is my version of the beaded goodness. I wasn't very inspired to do them back in the fall as it's not like you can wear open toe shoes here after October, but as it's getting warmer I'm back to being inspired.
Here are the steps:1. You can either buy the colored beads or paint your own. I chose to paint my own because I had faux pearls from the Dollar Store lying around.
2. Paint the heel orange. You can either paint multiple orange layers on, or paint the heel with a base coat of white paint first.
3. Strand the beads with jewelry wire. Make make two strands for every length for each shoe.
4. String the beads from longest to shortest and attach them to a jump ring on each side. Sew the jump rings onto the shoe.
5. Spray protective varnish over the beads and the heel and you're done.
I love these so much more than the original. And orange just makes it pop, don't you think?! By the way, don't hesitate to e mail me if you got any DIY requests, questions, or if you want to gnaw at your bad dream... And if I can't help
I'll compensate to act like this when I read them.
I recently made my own version of the gorgeous bead embellished heels from the Burberry 2012 Resort collection. I crafted mine by creating beaded embellishments to go over my shoes. This DIY is such a simple way to update your wardrobe - you can even use chains or different coloured beads for a different look.
Wearing: DIY Beaded shoe embellishments, New Look wide heel shoes, tribal mini from Thailand, Country Road singlet, Karen Walker Number One sunglasses.
DIY:
You need - brown and red wooden beads and black string.
1. I strung the beads so that I had two red and two brown strings of beads for each shoe - about 15cm long each.
2. I then tied two of each color together, securing at each end with black string, and then tying that string together in a bow at the back of the shoe. Essentially you will have 'necklaces' of brown and red beads for each shoe.
Voila! The best bit about these embellishments is you can wear them with any shoes, they also look great on some black t-bar flats I have. Instant tribal wardrobe updater.
DIY TASSLE ANKLE STRAPS
I love to redesign old patterns and give them modern twist.
Tatting and other lace making is my passion, but not in traditional way. I love to redesign old patterns and give them modern twist.
i
Image Information

This is a instructable for a removable fringes that will go with any shoes you have. They are inspired by Christian Louboutin fringe pumps.
i
Image Information

Any kind of fringe on a tape, I use acrylic, but they can be suede or felt too
Snaps
Scissors
Flame
Needle and thread
i
Image Information

With your foot flexed up measure desire length of the fringe plus 1/4 inch for closing
i
Image Information

Cut carefully not to damage the fringe
i
Image Information

Use any source of flame carefully: match, candle, lighter etc. to finish of the edges so they wont frey.
If you make it with suede or felt you can either leave it as it is or fold the endings and glue them securely.
i
Image Information

Attach snaps using needle and thread. You can also pick your own closing choice: hook, button, tie, buckle etc. Its up to you.
You can also finish it up with any design of tatting, crochet, etc.
i
Image Information

Here, done! You can wear it with any shoes you want! If you want them with the flats just pick shorter fringes, if you want them on the boots just make them wider. Your choice your imagination:)
Enjoy!!
Recycle Leather Feathers with Back Patent Chain Heel Cover/Spats
This item is very feminine with a touch of edge because of the chain and leather. Great look for a night out in the city.
This Heel Cover/Spat is a quick change to any pair of shoes you may have. Made from all recycled leather(cut remnants, NOT upcycled).
Very simple to wear, just slip your heel into the small elastic opening and pull the longer elastic over the heel of the shoe. Slip your feet in the shoe when the heel cover/spat is on and you are ready to go. Great for travel because it is very compact and you can just bring one pair of shoe.
They can be worn on any type of heels, flats, or even your current boots (depends on the boot).
This Heel Cover/Spat has the option of being strapless. If you would like to order one with out a strap(Mary Jane look), Please specify when ordering or else will be made as shown in picture.
Color/Fabrics used: (black) recycled cow leathers- Recycled leather are cut remnants, NOT upcycled, therefore they are like new, Metal patent black chain
Closure/Function: 1/4" Elastic (bra elastic)
Plus comes with a draw string pouch to keep them together ;)
Size: 6" H x 41/2" W

Cute shoes are hard to find, but for some reason, ugly shoes are readily available. Turn lemons into lemonade with quick shoe makeover. Spray on glue makes it easy to cover old shoes with new fabric.
For this project, I chose a fabric with a tie-dye pattern that was very forgiving to work with. Because the bright colors all blend together, I didn't need to worry about lining up any patterns or making sure my seams were perfect. The project that was way easier than I thought it would be, and the shoes are completely transformed into something fresh and fashionable.

Materials
Old shoes
Fabric, 1/2 yard
Tailor's chalk
Scissors
Spray adhesive, permanent
Paper drop cloth
Directions

Step 1: Cut a piece of fabric that covers the toe, sides and top of the shoe. Align the edge of the fabric with the edge of the shoe's toe. Use tailor's chalk to mark the center of the toe. This line will be your guide for tracing and placement.

Step 2: Keeping the toe mark lined up with the toe, hold the fabric on the shoe with one hand and trace the outside edge of the shoe with the other.

Step 3: Cut the fabric down the center of the opening in the top of the shoe. Cut almost all the way to the shoe, stopping about 1/4" from the shoe.

Step 4: Using the chalk as your guide, cut out the general shape. Lay paper down to catch the overspray from the glue, and then spray glue all over the back of the fabric.

Step 5: Working as quickly as you can, place the glued fabric on the shoe. Start by lining up the chalk mark with the center of the toe, then tug and smooth the fabric over the rest of the shoe. You have a minute or two before the glue fully sets, which gives you time to pull gently on any wrinkles.


Step 6: To wrap the fabric around the opening for the foot, make cuts into the fabric. Cut all the way to the edge of the shoe and then fold the flaps down and press them into the shoe.


Step 7: Cover the back of the shoe in using the same methods in steps 1-5. I traced along the seam where the back of the shoe meets the heel, cut my pattern, and sprayed the glue and wrapped the shoe.


Step 8: Cover the heel of the shoe last. Cut and apply glue to a piece of fabric that will wrap all the way around the heel. Stick the fabric to the heel, smooth it out, then make the cuts necessary to wrap the heel without any wrinkles. Be sure to trim the fabric as close to the bottom of the heel as possible.

---------------------------------------------------------------------------------------------------------------------------
FEATHER BELT

DIY BIKINI TOP
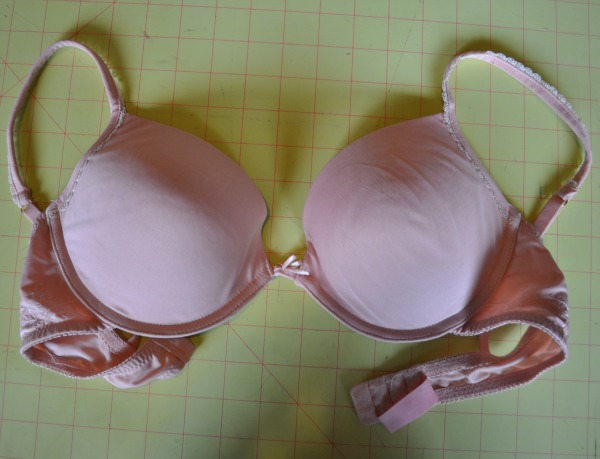
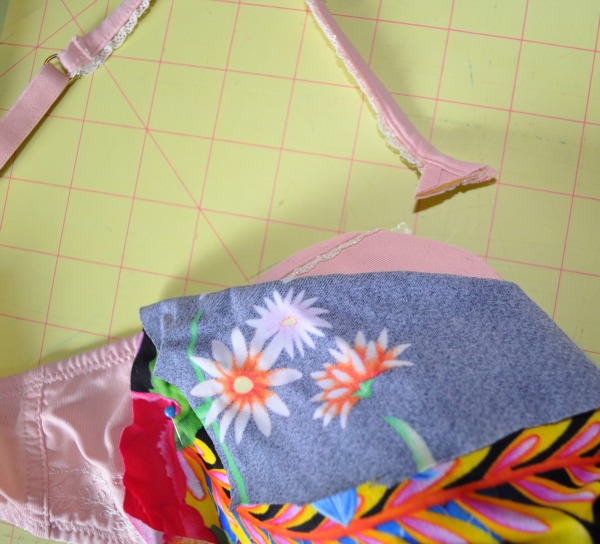
Do you ever wish you could have a bathingsuit top that would fit as perfectly as your bra? Well now you can!!
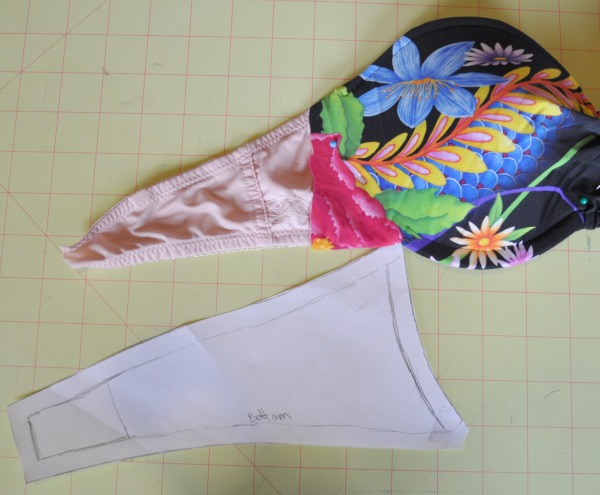
Materials and Supplies
-Old Bra
-Bathing suit fabric (under 1/2 meter)
-Thread to Match
-Sewing Machine
-Pins
-Hand sewing needle
-Bathingsuit Clasp
Instructions
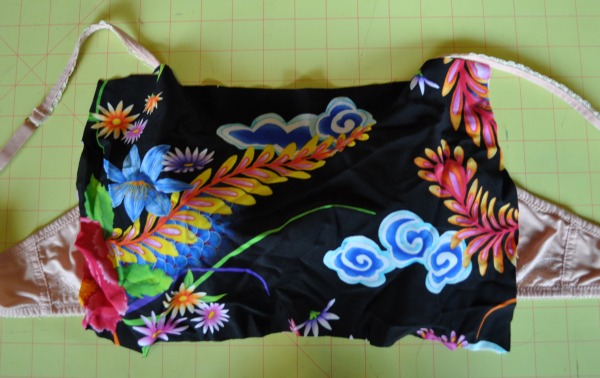
1. Cut out a rectangle from your fabric that will completely cover both bra cups with plenty of extra room.
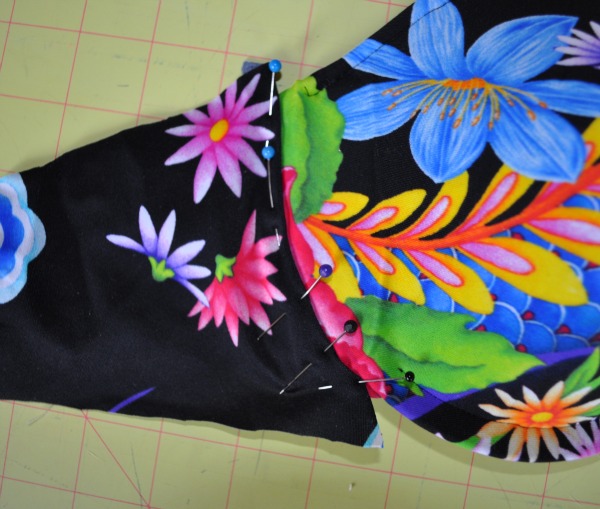
2. Pin the fabric to the bra around the underwire starting at one side working your way to the middle. Pin both sides. Make sure that you have left the fabric a bit loose around the center front.
3. Cut a slit down the center of your fabric that stops at least an inch above your bra edge.
4. Cut off your bra straps, if needed round off the top of the bra so that it's smooth.
5. Fold the fabric down over the top of the bra and pin down.
6. Sew down the fabric along the top of the bra ending right at the underwire. Sew down the fabric on the bottom of the bra starting at the bottom of the side band, and ending on the opposite side. Make sure you do not sew through the underwire, or you will be going through A LOT of needles!
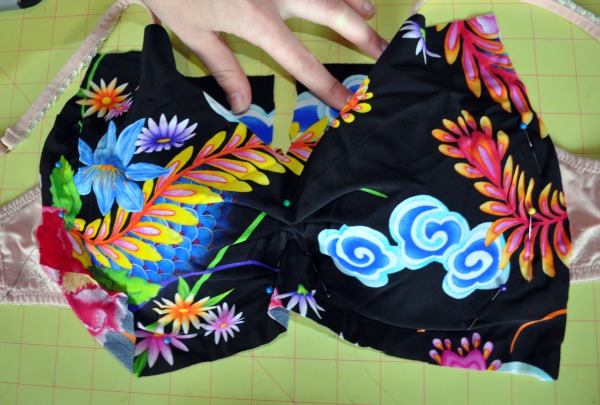
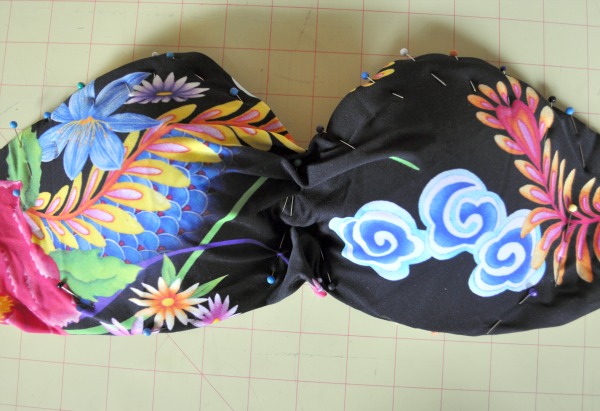
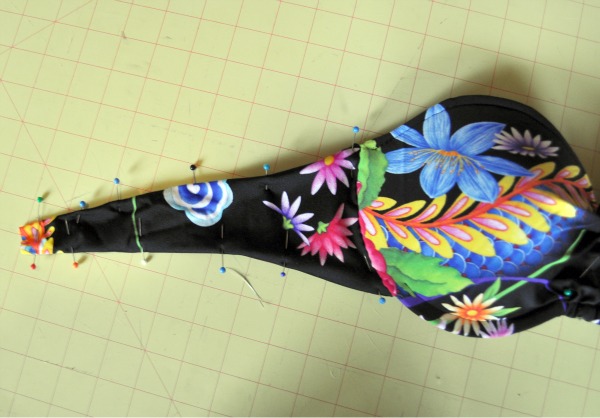
7. Cut off the back bra closures. Trace a pattern of the side straps that starts from the side of the underwire. Be sure to include at least a 1cm seam allowance. Also make the band a bit longer at the back.
8. Cut out two side bands from your fabric.
9. Turn under the edge of your side band and pin it onto the bra up against the underwire.
10. Hand sew the band onto the bra in the same spot.
11. Fold down the top and bottom edges of the band down over your bra.
12. Sew down the fabric starting at the edge of the underwire going to the end of the band on both the top and the bottom. Do this for both sides.
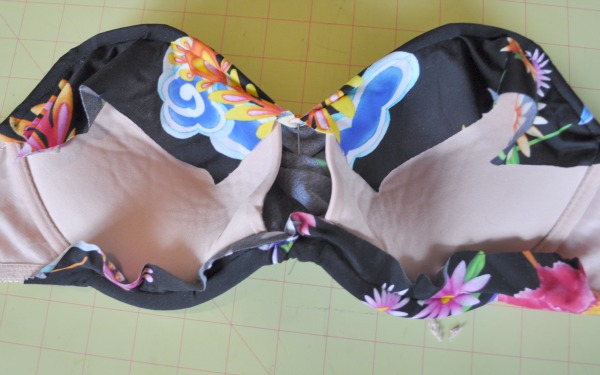
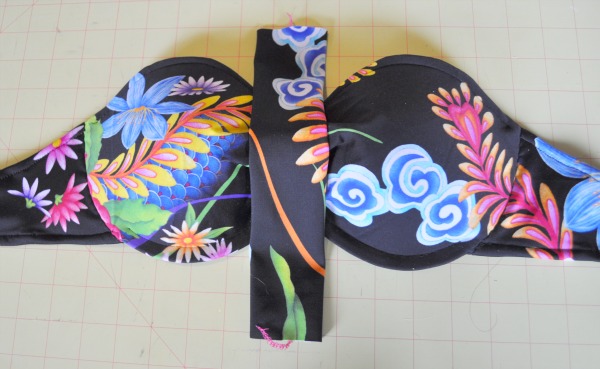
13. Cut out a piece of fabric approximately 15cm wide by 25cm long. Make a tubed band from this piece by sewing the long edges together.
14. Wrap the band around the center front of the bra and hand sew it into place on the inside of the bra. Make sure no raw edges show on the front of your bathing suit.
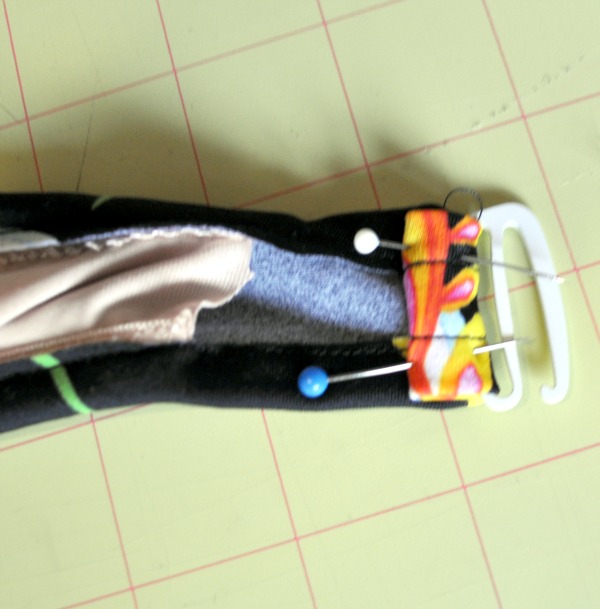
15. On one side of the back band sew in the bathing suit clasp. On the otherside sew a small loop for the clasp to hold into. (The loop will look the same as below, just without the clasp in it)
All Done!!
GORGEOUS SHOES
Max Kibardin started his carreer as a model but his passion for fashion was so strong that he gave up his studies in architecture to become a shoe designer. His inspiration comes from italians 60's movies and his ambition is to create shoes of a timeless elegance.
Shoes are in his genes.
Gianvito Rossi is the son of the famous
Sergio Rossi. He started his own line in 2007. His shoes are modern, feminine, innovative but with a classic elegance.
Working out of his Soho-based studio in Manhattan,
Ingelmo mingles the Cuban influences of his heritage with a directional New York edge.
Modern art, European design, pop culture and nightlife are some of Jerome’s inspirations. “I initially think in terms of shape, silhouette and structure when I design. It’s later on that I bring fashion in the equation”.
Make some room in your heart for your new favorite
shoe designer. These are some of the most talked about shoe designers of the moment. They're young with a strong sense of style. Their shoes are innovative but don't forget the importance of the classical style. Get excited about their creations (as I am) and start collecting them: they are the new must haves.
.


