The 30 for 30 Challenge
.You pick 30 items of clothing (shoes included, accessories not included) and wear them and only them for 30 days straight. In those 30 days I'm forced to pair clothing that I would have never thought to pair. Another part of the challenge is that I'm not allow to shop for those 30 days. Sounds easy enough, right? Well, I'm about to find out.I've decided to do the 30 for 30 Challenge.I've picked the majority of my clothing (only a few lingering/heart breaking decisions left to make) and I'll be posting my 30 item wardrobe over the next 2 weeks. I also hope to take a picture of each outfit, so I can prove my follow-through. We'll see. Thirty days is a long time.. Please remember that tights, necklaces, scarves, and jackets (as in outerwear) are not included in the 30 items.


Today’s DIY is inspired by the fabulous Elizabeth and James feathered blazer worn above by Krystal, Chiara, and Anh. While I love myself a white blazer anytime of the year, I feel that you can add some fun, frothy feathers to any structured piece to add movement, so I decided to update my black vest. I definitely suggest picking a piece that hits at least at your hip- anything shorter will add too much volume to your waist. So instead of paying $665 for the E&J version, we get a simple look alike for around $10!

Supplies:
1. Jacket or vest in any color
2. Scissors
3. Fabric Glue or E6000 Glue and optional nozzle
4. Pins
5. 2-3 yds of feather trim. I chose faux feathers for $5/yd from Mood, but you can get all types of real feathers for $20-$30 a yard if you so desire. They come in tons of colors and shapes, including the light wispy ones on the E&J blazer.


{I chose to alternate the direction of the feathers}

{Make sure you add the trim below any pockets!}


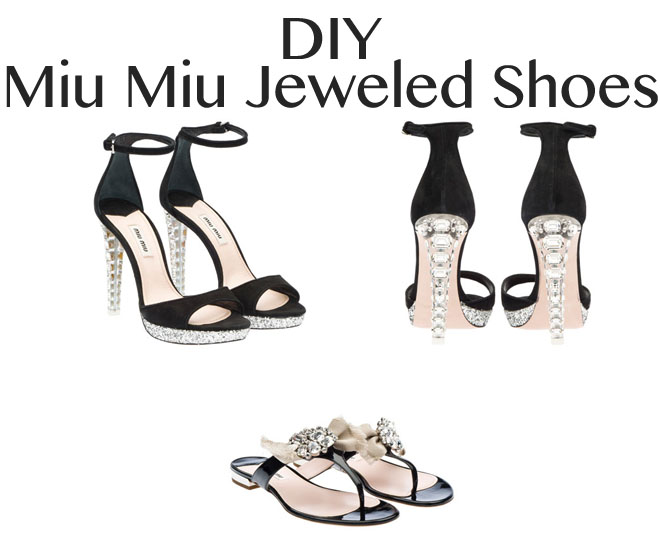
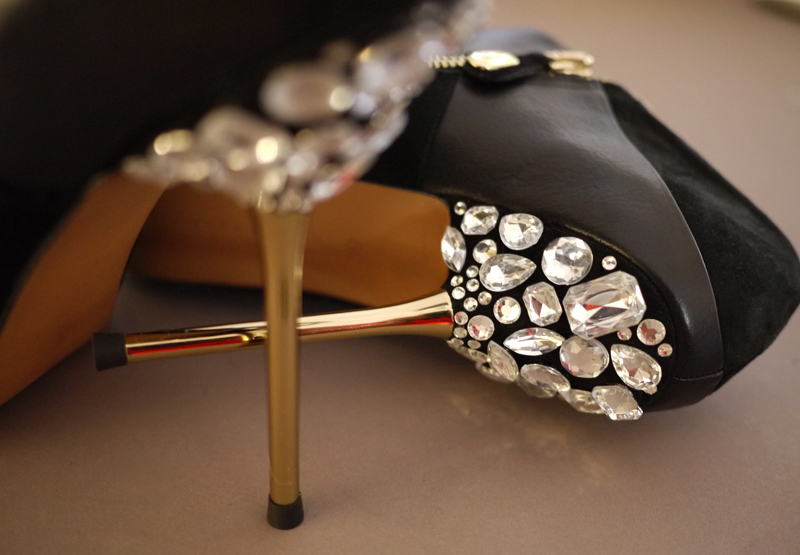
Here is the list of items needed:
- a pair of heeled shoes
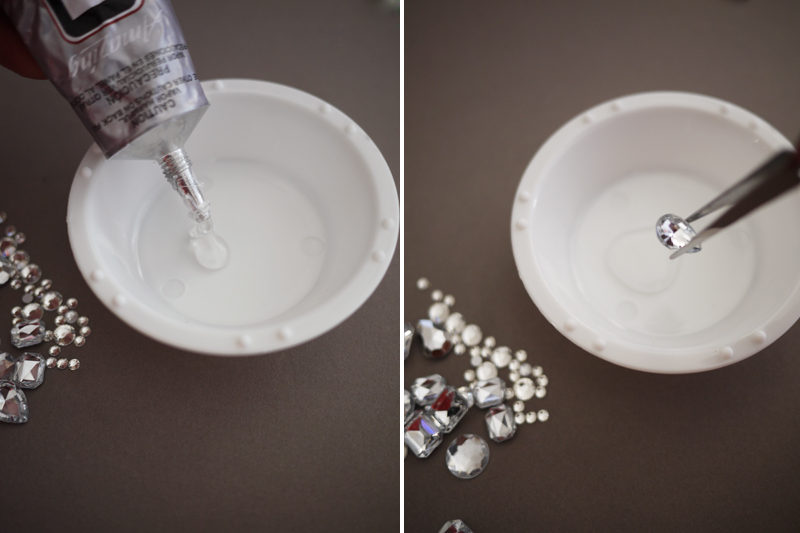
- 40-50 large and medium (10-15 mm) multi-shaped rhinestones
- 30-40 small (3-6 mm) round rhinestones
- E-6000 glue
- tweezers
- small dish or container
- toothpick
- flat nose pliers
- flat nose pliers (optional)
Some pics from their tutorial - but if you want more detailed info, link is here:


THUMB TACK HEEL WHAT A GREAT IDEA, I HAVE TO DO THIS


DIY Glitter Brogues – How To Cover Your Shoes In Glitter Without Making A Mess

This tutorial will teach you how to make eye-catching glittery shoes using a technique that won't make a mess in the process or have you leaving a tell-tale trail of glitter wherever you go. No vacuum cleaner necessary! Read on...
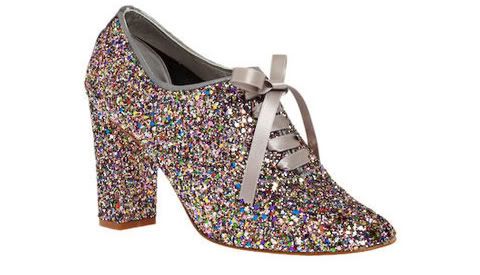
Modcloth "Knock Your Socks Off" Heels - $134.99 (Sold Out)
Glitter shoes have been around for a long time, just think of Dorothy and The Wizard Of Oz. The inspiration for this pair in particular comes from the popular ModCloth "Knock Your Socks Off" heels, which are now sold out and unfortunately not immune to the shedding issue. According to Christina, a reviewer: "They are AMAZING, so many people have complemented me over these shoes. However the glitter falls of the shoes in massive amounts, and I am afraid this will cause bald spots on the shoes." I don't mean to call out a beautiful pair of shoes that I would wear in a heartbeat--I just want to point out that this is a problem for most glittery things. However, I can tell you the trick to making sure the glitter stays put with this simple DIY.

What you'll need:
- A pair of shoes!
Any shoe will do.Hard sturdy shoes work best. - Loose glitter
- Mod Podge (glossy)
- A paint brush
- Masking tape or painter's tape (if necessary)
- Q-tips for cleaning eyeholes (if necessary)
Your first step is to remove any laces and use tape to protect the inside of the eyehole flaps or any other areas that might accidentally touch glue (if applicable). Pour the Mod Podge into a a small disposable receptacle like a clean paper cup. Mix in loose glitter to your desired coverage. If you want the shoes completely covered, pour in a lot of glitter, but keep the consistency runny rather than peanut-buttery. Paint the Podge and glitter mix on the shoe in a thin layer. Clean up the eyeholes or any mistakes with a q-tip as you go, and wait until the shoe is dry before adding more layers. Fill in any missed spots, and allow to dry again. Then paint a final thin layer of Mod Podge alone without any glitter mixed in. Once dry, remove the masking tape slowly and carefully. That's it! You're done, Twinkle Toes!

Most glittery shoes are made by spraying glue on a shoe and then dumping loose glitter on top. It's no wonder they lose a lot of glitter! Using my technique, you mix the glitter in with the glue, and then add a clear protective layer. The glitter is completely covered, but still shines though. It isn't going anywhere, not even if you rub on the shoe. Guaranteed! This is also a good way to preserve a pair of factory-made glitter shoes that have the shedding problem, such as the cute ModCloth ones.

Special Note: Can the shoes get wet? They can handle a little splash here and there, but treat them like suede shoes and don't wear them in the rain. You can spray them with a clear acrylic sealant (sold next to Mod Podge) to make them waterproof, but the spray is toxic and I don't personally recommend it. I'd rather check the weather before going out and keep them friendly. ![]()
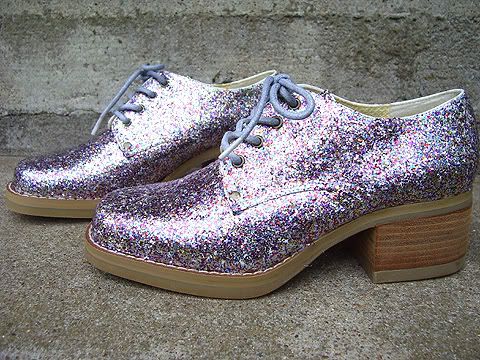
Glitter Brogues. Size: 7M - $? Make me an offer! Sold.
These shoes aren't actually mine; they're not my size. I made them for you! Interested? Email me! (Update: Sold.) I figure I'll let you all have a grab at them before putting them on eBay or Etsy. The shoe is in mint condition and made of genuine leather (sorry, Vegans!). The original label is Mainframe. I recommend wearing them with sky blue socks and a white or peach summer dress. Cute, right? Ah, I wish I could wear them!


.